|
|
Post by UnforseenWeather on Feb 14, 2012 21:52:29 GMT -5
I have to abashedly admit, I have never painted a rifle.
What do you guys use? Regular old camo Krylon? Any surface prep tricks? How long do you wait for the paint to dry?
|
|
|
|
Post by Hawkeye on Feb 14, 2012 22:09:58 GMT -5
Krylon camo line.
Wipe down with a clean dry cloth.
Spray.
Will be dry to touch in a few minutes, takes a day or three to fully cure.
|
|
matt
New Member
 Trigger Jerk
Posts: 244
|
Post by matt on Feb 15, 2012 11:03:48 GMT -5
I have spent money on Duracoat in the past but now, I just use Krylon. It protects against rust fairly well and it cleans up easily. The Krylon "Fusion" paints really seem to adhere well, especially the plastic (Krylon's camo line now has their Fusion technology).
|
|
4track
Junior Member
Posts: 276
|
Post by 4track on Feb 16, 2012 17:15:37 GMT -5
I formerly used Brownells Alumahyde II, epoxy paint, but it is a huge waste of time and money. The cure time is ridiculous, and the paint still chips off. The following AK and M1A rifles were sprayed with Brownells color "Coyote", which is a dead match for most makers' FDE colored components:   The Allumahyde colors are not nearly as flat as Krylon, so I started trying Krylon next. The Krylon paint job dries very fast, and can be "touched up" easily, however the color pallet is very limited. The "green" is very much dark gray, and does not match the natural environment very well. I did the following in Krylon flat camouflage colors:      I have since moved on to using Aervoe camouflage colors. They are ultra flat, and the color choices are far superior to any other brand. I painted the bellow optics with Aervoe "Field Drab", and it came out a nearly perfect Coyote Brown:  |
|
|
|
Post by Hawkeye on Feb 16, 2012 18:03:05 GMT -5
I've been wanting to try some of the Aervoe stuff, but I've heard conflicint reports about the dry/cure time on them.
|
|
4track
Junior Member
Posts: 276
|
Post by 4track on Feb 16, 2012 19:45:18 GMT -5
I've been wanting to try some of the Aervoe stuff, but I've heard conflicint reports about the dry/cure time on them. Aervoe dries just as fast as Krylon, in my experience. You will be well pleased with it. |
|
|
|
Post by Hawkeye on Feb 16, 2012 20:12:15 GMT -5
Thats good to know. I do like the color selection that Aervoe has.
|
|
|
|
Post by UnforseenWeather on Feb 16, 2012 20:47:12 GMT -5
Where can this Aervoe be purchased?
|
|
Dedicatedpro
New Member
Sweat More Now Bleed Less Later
Posts: 209
|
Post by Dedicatedpro on Feb 16, 2012 23:24:59 GMT -5
Nice work 4track!
|
|
4track
Junior Member
Posts: 276
|
Post by 4track on Feb 17, 2012 6:23:47 GMT -5
Where can this Aervoe be purchased? Online, I order from Aerfoe from Brownells, which I hate to do, because they charge a big mark-up on all of their items...plus it has to be shipped UPS, due to the Haz-Mat nature of the aerosol cans. They do stock all of the best camouflage, colors, however, so to offset the shipping, I usually make a large purchase, of several cans of each color, and stock up on them. Later this weekend, I will try to compile a list of the Aervoe colors that I use, and try to detail what colors make a good Multicam pattern. I will also post of some more photo examples of this color pallet, too. |
|
matt
New Member
Trigger Jerk
Posts: 244
|
Post by matt on Feb 17, 2012 8:21:30 GMT -5
Later this weekend, I will try to compile a list of the Aervoe colors that I use, and try to detail what colors make a good Multicam pattern. I will also post of some more photo examples of this color pallet, too. That would be much appreciated! |
|
|
|
Post by Hawkeye on Feb 17, 2012 9:12:42 GMT -5
|
|
4track
Junior Member
Posts: 276
|
Post by 4track on Feb 17, 2012 17:39:03 GMT -5
|
|
fm18
New Member
Posts: 73
|
Post by fm18 on Feb 17, 2012 20:41:34 GMT -5
Good stuff 4track and thanks for the links too. Gotta break down and give this a try myself I guess!  |
|
4track
Junior Member
Posts: 276
|
Post by 4track on Feb 18, 2012 13:07:46 GMT -5
Since the weather was nice this morning, I was able to go outside and take a few photographs, which would help to illustrate my aerosol can technique for achieving a Mulitcam Pattern effect. For the project, I used the following paints from Aervoe: (from left to right) Olive Drab, Sand, Dark Green, Field Drab.  I also used two of the following from Krylon: (from left to right) Brown and Woodland Light Green, (which I used in this project), and also Sand and Olive (which I did not use). 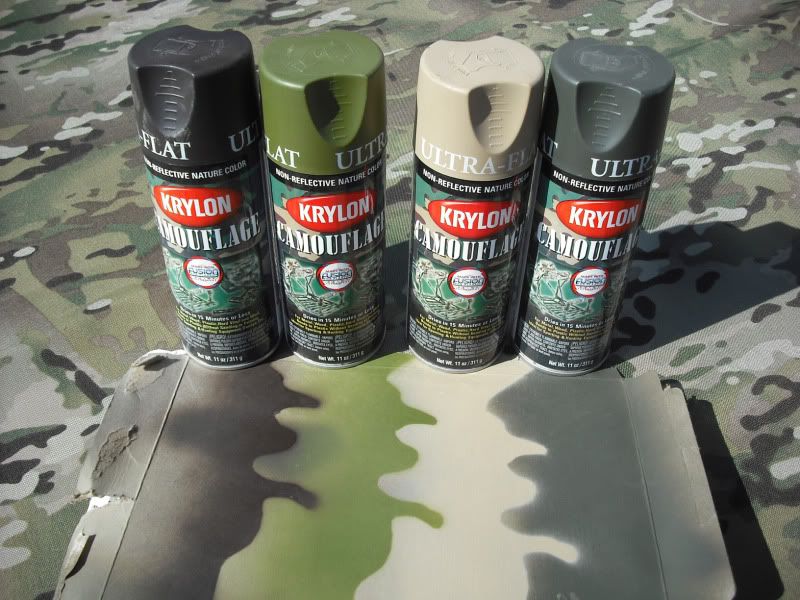 Here, you can compare the color pallet of the two brands, with Krylon on the left, and Aervoe is on the right.  I also used these three simple Multicam shaped stencils, which I cut out of card stock from empty cookie and cereal boxes.  For the example in this lesson, I thought that I would update the spray finish that I had applied to my Kevlar helmet a few years ago.  As you can see, the old paint job that I did on my helmet looks very gray, and the overall effect is very flat...like an Army ACU pattern almost. This is because I had only used Krylon Green and Sand. The Krylon Green is so dark, that I find it does not lend itself to good camouflage in the natural world. The first step I used was to give the entire helmet an even under coating of Aervoe Field Drab. Notice that this color is a very good match to USMC Coyote Brown in color, and that, like many paints, the cap color is a terrible indicator of the final result.  Next, I used the Aervoe Sand to break up the solid shape of the helmet.  After letting this coat dry to the touch, I then used the larger one of my card stock stencils to begin adding areas of Aervoe Dark Green. The idea here is to have one hard edge of the green color, and then let the other edge fade into the background browns.  Next, I blended in a tiny bit of Aervoe Olive Drab and Krylon Woodland Light Green.  Then, I used my small splotch stencils to apply Aervo Sand, and Krylon Brown. If using a limited stencil selection, as I am, a good idea would be to reverse the stencils from time to time, in order to avoid too much repletion in the shapes.  After that, I let the helmet sit in the sun until dry. While the paints dried to the touch in only a few minutes, I would highly recommend letting the paint cure for 24 hours before using, to ensure a more durable finish.  The actual spray time that I spent on this project was twenty minutes, however, as with most things in life, more time, effort and attention to detail with significantly enhance the end result.  |
|


