otis
New Member
 luke 22:36
Posts: 179
|
Post by otis on Oct 29, 2013 20:02:30 GMT -5
you've gotten too good at that. love seeing the product of each step.
|
|
4track
Junior Member
Posts: 276
|
Post by 4track on Oct 30, 2013 13:28:38 GMT -5
It is now dry enough for use.  On Cordura:  In the wild:  you've gotten too good at that. love seeing the product of each step. I appreciated the compliment, Otis, but I suppose that I am "retired" from painting, for now, as I have Multicam coated nearly every single fighting weapon that I own.   I now plan to focus my efforts on motivating and assisting others within my sphere of influence to get their weapons painted. |
|
|
|
Post by Hawkeye on Oct 30, 2013 16:07:39 GMT -5
Nicely done indeed.
|
|
|
|
Post by Patriotic Sheepdog on Oct 30, 2013 19:41:25 GMT -5
Wish I lived closer to you. I need a mentor with this as I don't want to screw things up. I guess I just need to "man up" and do it. I'm just a perfectionist and want it perfect. Need to let it go I guess.
Great job though 4track
|
|
4track
Junior Member
Posts: 276
|
Post by 4track on Oct 31, 2013 14:29:54 GMT -5
Thanks again for the compliments guys. I must admit that I was very nervous and unsure of myself on my first one; my shotgun. In fact, I ended up repainting it a year later, after I had refined and developed my materials and technique quite a bit. You can see how the color and pattern on the shotgun is not quite the same as my later painted weapons:   For your first time, I would highly recommend that you start with a lower priority gun, so that you can get a feel for how the process works, and then you can make the improvements when you do paint your higher priority weapon. If you don't have any other real weapons to practice on, I have also practiced several times, by spray painting toy weapons belonging to both my nephew and also my buddy's son.  This is my best buddy's first painted weapon, which he did a few months ago.  I merely provided him with the paint, some stencils, a little bit of friendly ribbing (I mean, guidance) and a couple pints of beer. 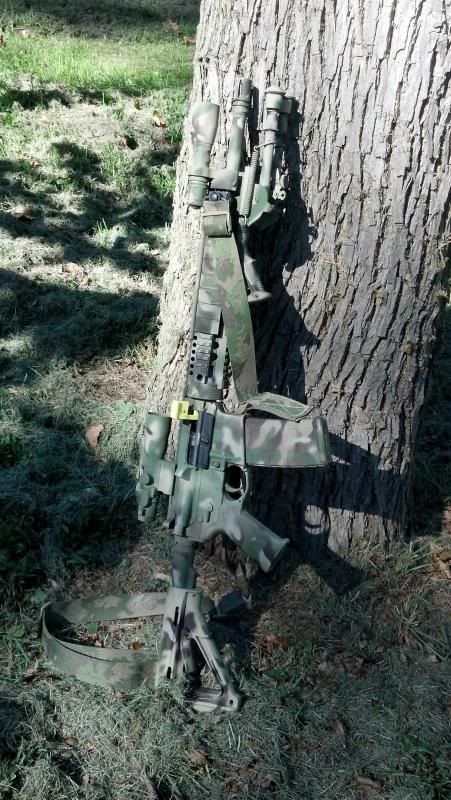 He didn't want Multicam, but rather, some kind of a lighter woodland pattern, like ATACS FG.  I think it turned out excellently, especially for his very first go around. On a couple of places, he was not content with his results, but I had him just repaint over those areas, until he was satisfied. The most important thing to remember is this: No matter what pattern, colors or technique that you actually use, or what the final outcome of your paint job is, YOU HAVE BEEN SUCCESSFUL IF you have removed your weapon's Target Indicator Black color, replaced it with a natural drab color, and successfully broken up its outline. Anything beyond that is just added style points. Hopefully, you will have had a little fun doing it, too, and your weapon will forever be a one-of-a-kind piece of art. |
|
|
|
Post by Silent Snake Light Fighter on Nov 28, 2013 21:25:28 GMT -5
this is great info, so how is the wear and tear of this Aervoe finish on firearms? since they get banged around, rubbed on by gear and other things (cleaning, dirt and grit) does it begin to show wear spots at all? how long before you need a touchup?
|
|
4track
Junior Member
Posts: 276
|
Post by 4track on Nov 29, 2013 20:09:33 GMT -5
Yeah, it wears off with use, for sure.
All of the high surfaces are showing the black underneath, but it is not really a big deal.
Overall, the camouflage effect is still very effective, and I probably will not repaint them for several years, unless I want to change some components or the patterns.
|
|
|
|
Post by Silent Snake Light Fighter on Nov 29, 2013 20:42:25 GMT -5
ok...what about cleaning? any products to avoid with Aervoe?
|
|
4track
Junior Member
Posts: 276
|
Post by 4track on Nov 30, 2013 5:42:52 GMT -5
Cleaning….what is that? ;D
I really don't clean my guns, so I could not say for sure, but remember; it is just spray paint.
There is nothing magical about it, just because it says Aervoe on the can, or because people like Pat Rogers and others endorse the brand.
I've never personally experienced the paint coming off from every day contact with lube or solvents, but I have used brake fluid (not cleaner) and a tooth brush to remove a paint job once. Any solvents that are allowed to soak in, and then are scrubbed hard, will likely remove the paint.
Remember, too, that the main objective is to make the weapon anything but black and to break up its outline, not to make it magazine photo worthy while it sleeps safely, unused in a safe. Missing spots of paint are not noticeable at distance, and they should not be of major concern for a fighting tool.
Besides, if a worn through spot annoys you, it is easy to recover the area with a quick shot of paint.
|
|
|
|
Post by Silent Snake Light Fighter on Nov 30, 2013 10:43:59 GMT -5
hey, thats really all that matters is breakup of the firearm...not disputing that...just wondering the overal durability...my guess is it is somewhat better than krylon for some surfaces...
i could probably get away with using motor oil as a lube/cleaner if i had to...
but regardless, the results you show of how well it can break the lines of these rifles up is enough for me to invest in some Aervoe...
|
|
4track
Junior Member
Posts: 276
|
Post by 4track on Dec 2, 2013 19:53:58 GMT -5
|
|
|
|
Post by Silent Snake Light Fighter on Dec 2, 2013 20:00:54 GMT -5
hey it still works though...i may decied to do a bottom coat in some sort of sand with duracoat first and then use the aervoe as the pattern paint, but im still tossing that idea round...and i dont baby anything either, i am rough on everything i own...
|
|
4track
Junior Member
Posts: 276
|
Post by 4track on Dec 2, 2013 20:38:17 GMT -5
Yeah, you could use the Duracoat as a base.
Another idea would be to start FDE (or whatever color) anodized receivers, grips, hand guards, stocks, etc., so that tan would show through the worn areas, instead of black.
I look forward to seeing what you come up with.
|
|
|
|
Post by Silent Snake Light Fighter on Dec 7, 2013 19:35:40 GMT -5
Yeah, you could use the Duracoat as a base. Another idea would be to start FDE (or whatever color) anodized receivers, grips, hand guards, stocks, etc., so that tan would show through the worn areas, instead of black. I look forward to seeing what you come up with. so do i lol...one other thing i am curious about...i plan on trying to emulate the ATACs FG pattern, since i really like that pattern...and i think i can do it since i have done enough research on it to know how to effectively emulate it... anyway, what aervoe colors would you recomment for that? it needs some sort of sand, then coyote brown, then a light green, then a darker green and maybe a dark earth/brown...i think there are about 6 different colors in the overall pattern...i have seen some people try to do it in 4 colors, but it doesnt quite come out right FDE would really be a good base color in a duracoat, its much less noticeable than black final pattern would be enhanced with sea sponge along some of the edges, and i may do each layer followed with the sponge here and there intermittently...if you study the pattern closely you can see where sponge is and is not appropriate... i have painted rifles before using rattle can and one nice thing about it is you can always improve the overall effect as many times as you want later...as long as you take it easy and spray lightly enough to limit the build up...and of course i dont want to rush it...that tends to give less than stellar results... |
|
otis
New Member
luke 22:36
Posts: 179
|
Post by otis on Oct 4, 2014 16:23:37 GMT -5
finally got a few cans of flat rustoleum, just did a quick test on a machete sheath, hopefully i get some free time (ha!) in the next week or two to paint my rifle.
|
|