
Post by TX-Zen on Feb 18, 2012 23:36:04 GMT -5
Guys,
Thought you might be interested in a little more detailed info on the 5.45 optics and the Russian 400m zero for the AK74
I've posted all these pics in the pic thread already but I wanted to add the specific information about each optic and some clarification on the 400m zero principle. I hope the wording makes sense, it's easy enough to do in real life actually and sounds more complicated than it really is.
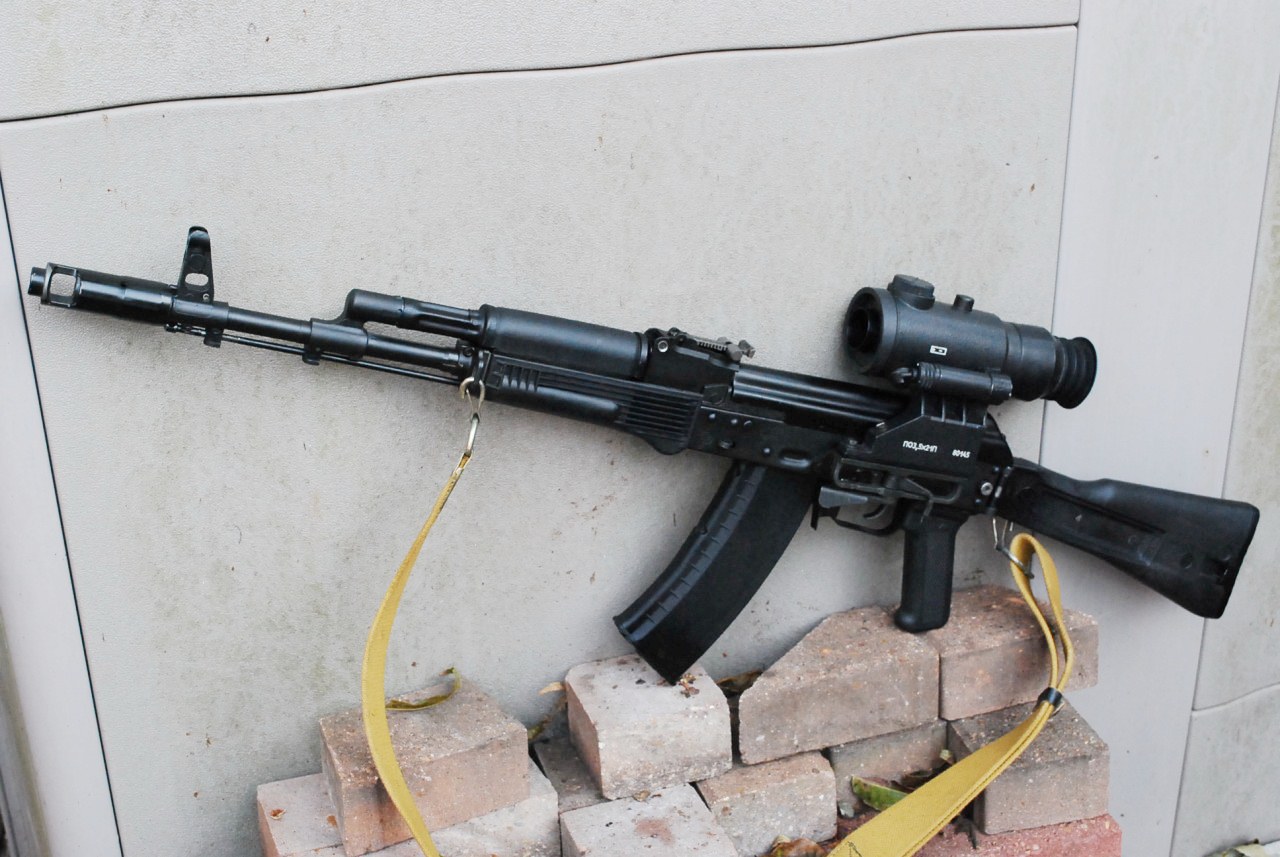
I recently acquired the very modern 1P78 Kashtan optic calibrated for 5.45x39. Miglan did a really sweet review also, I thought I'd put my thoughts down and at the same time add a little about the different 5.45 optic's on the market. It shouldn't really be a surprise if you're into AK's but the Russians have made newer designs than the older PSO/POSP series optics that we are familiar with. They have built a few dedicated 5.45 designs which have modern features and interesting concepts. Being a 5.45 buff I've picked up a few of these optics and figured I'd put out some observations and theories along with some hands on experiences.
First off a little background on what is available in 5.45 calibration and a little about what they are designed for, at least as I understand it. There are 4 5.45x39 optics that I know of: PO 3.5x21P, Zeiss ZFK 4x25, 1P29 and now the 1P78 Kashtan. The Zeiss is the oldest of them being a cold war optic with a PSO body style and chin weld. Don't let the age and appearance fool you though, it's a tight little optic with amazing glass quality. The 1P29 is a Soviet copy of the British Trilux/SUIT optic with the inverted reticule and all, also relatively older but with some modern design built in. PO 3.5x21P is a wide angle, huge FOV optic that I believe was intended to try and capture military sales but so far hasn't in Russia (UPDATE: Venezuela has purchased PO 3.5x21P for the Army and it is in service on the AK103 with 7.62x39 calibration). Lastly the new 1P78 Kashtan has arrived, it is current military issue and has been accepted for service from what I know.
According to the documentation I've seen for the modern 5.45 optics they are designed for rapid target acquisition and first round hits out to 400m, which seems to be the distance the Russians are optimizing these scopes for and employment of the AK74M too. I first heard of this number with the PK-AS red dot and it has come up a few times with optics like 1P29 and 1P78 also, as far as I can see the Russians feel this is a practical engagement distance for the AK74M, and my own experience lines up with this too.
From my understanding the basic concept is to zero the optic at 100m but have point of impact higher than point of aim, this creates a 400m zero (or a 300m zero) based how much higher POI is than POA at 100m.
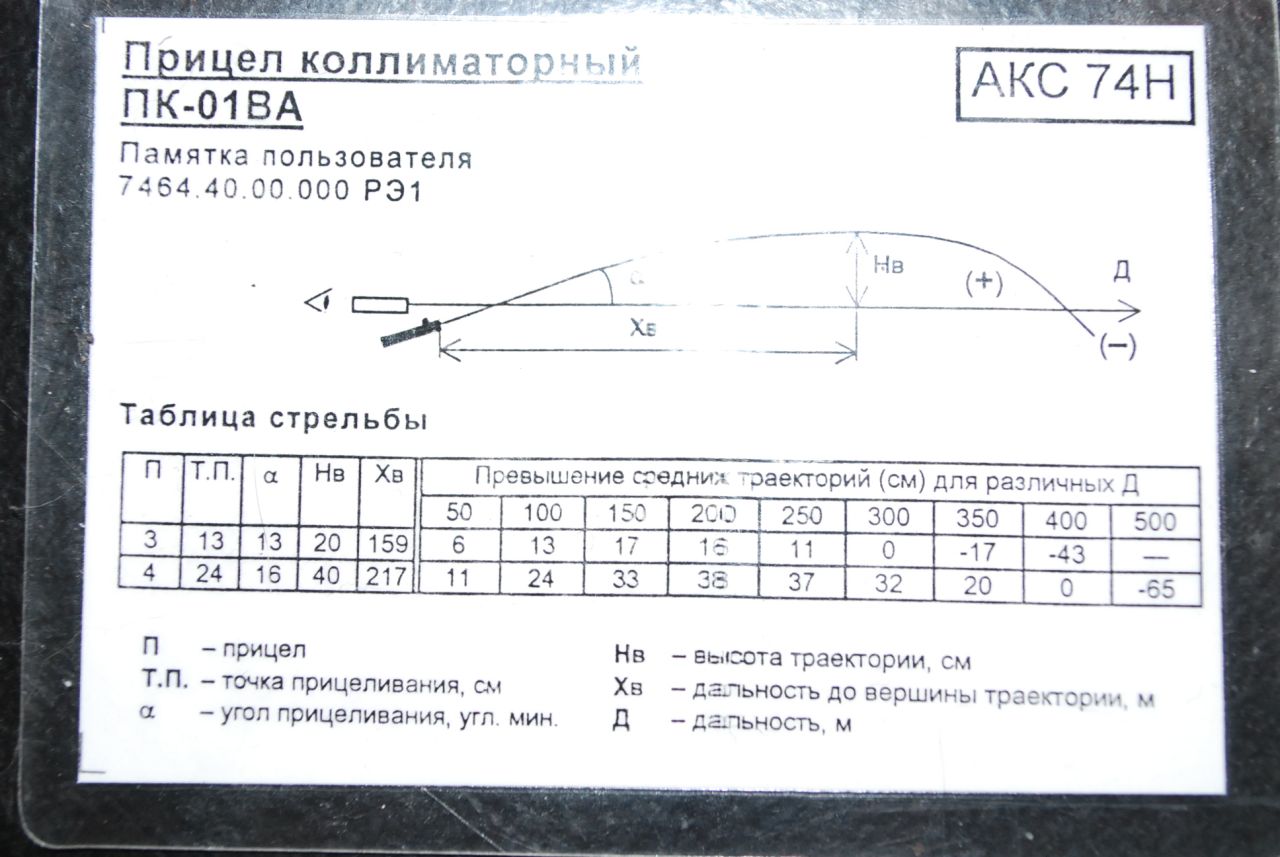
As you can see from the data cards if you want a 400m zero all you have to do is make your rounds land 24cm higher than your point of aim when zeroing (from 100m).
If you want a 300m zero make your rounds land 13cm higher than point of aim (also at 100m)
300m zero
So basically instead of having your point of impact match your point of aim at 100m and then knowing hold overs, the Russians have simplified the concept by making point of impact higher than point of aim.
At closer ranges the round will hit in the head/upper torso region while at longer ranges the same center mass point of aim will get hits at the expected point of aim. What this means in the field is a simple point and shoot always COM point of aim that's good from close to long range. All the 74M rifleman needs to do is line up and shoot without having to get into detail on range finding etc. Seems like this is the same concept as using a red dot vs irons, or why ACOG's are so popular on AR's. Generally speaking t it looks like the magic difference in POI vs POA at 100m is about 22-25cm.
After experimenting with this type of zero out to 300 yards on a few 5.45 optics I have to say for field conditions it works really well, just as intended. It's not so hot when you're trying to impress your friends shooting clays off the backstop at 100 yards due to the difference in POI vs POA, but for snap shooting on larger targets it's been working great. Basically it's the same concept as zeroing at 100m with irons and then switching to battlesight and leaving it alone. With both irons and these scopes effectively you point and shoot for most ranges and can reasonably expect hits somewhere on the target. Pretty much the same as I was trained in the Army back in the day, use a little hold over or under but don't change anything mechanical, just shoot when you see the target.
Another difference between modern optics like 1P29, PO 3.5 and Kashtan vs the older PSO series is that part of the fast acquisition concept is based on the reticule itself and the fact that you don't fool with the turrets for long range shooting. If zeroed properly you use the same chevron all the way out to 400m, then depending on the optic you may have additional chevrons for 500-700m for example, or in the case of the 1P29 a simple cam for the longer shots. For these modern scopes it's the reticule that does the work which lends itself to quicker shooting. While PSO's have additional chevrons for quick long range shooting, the Kashtan and PO3.5 have dispensed with the turret being used for the BDC correction. Again that means nothing to fiddle with in the field, just aim and shoot.
Impressions of the Kashtan itself
FOV is really nice, pretty similar to the PO 3.5x21P and much better than 1P29 or the ZFK. At 2.8x it ends up being a really usable magnification that in some ways does seem more like a red dot than a magnified scope. Both eyes open shooting is possible but not quite as easy as PK-AS or Rakurz because of the eye cup and while it does have eye relief it's easily taken care of with the rubber eyepiece (a common feature on Soviet/Russian scopes and works really well). The optic has an orange/yellow coating designed to reduce eye strain and enhance clarity (thanks to Doug Ford/Tantal for the clarification on that).

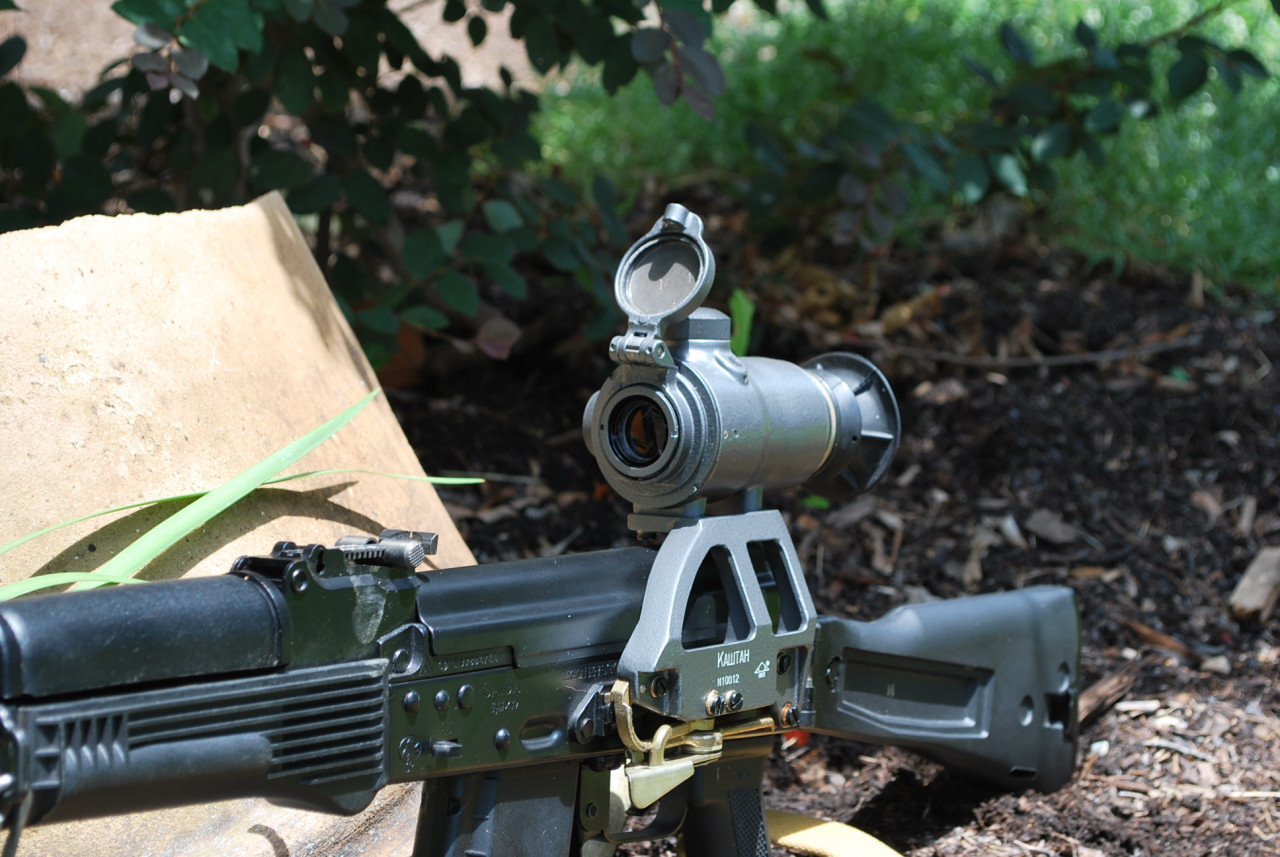
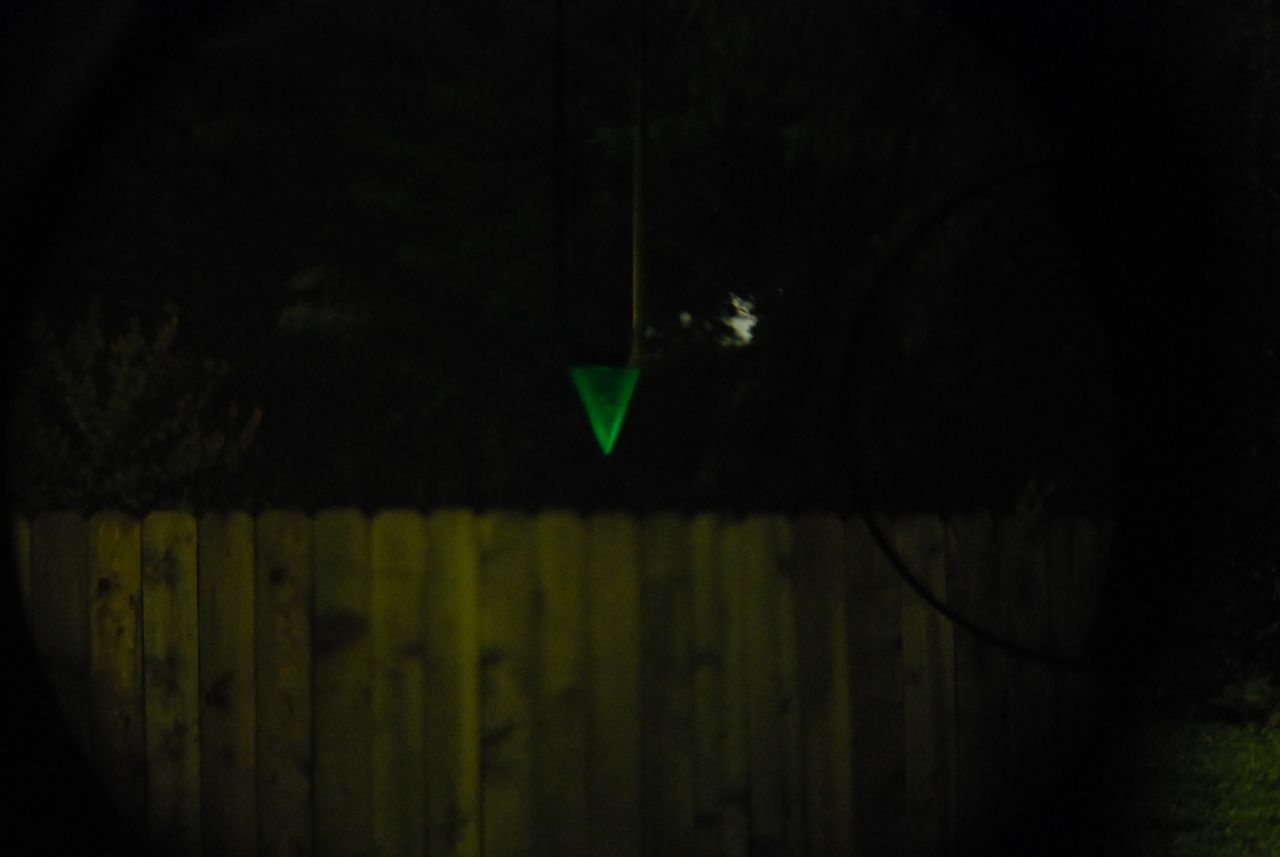
The Kashtan is tritium illuminated meaning no batteries and no circuitry to break, it's always on and the operator has to do nothing to get the illumination to work. The reticule is black during the day but When light levels drop low enough you can immediately see the illumination. This is a feature I am really enjoying on modern Russian optics like Kashtan, 1P76 Rakurz and the 1P29/UPO-1, it's smart and very simple. No more complaints about battery life on combloc optics

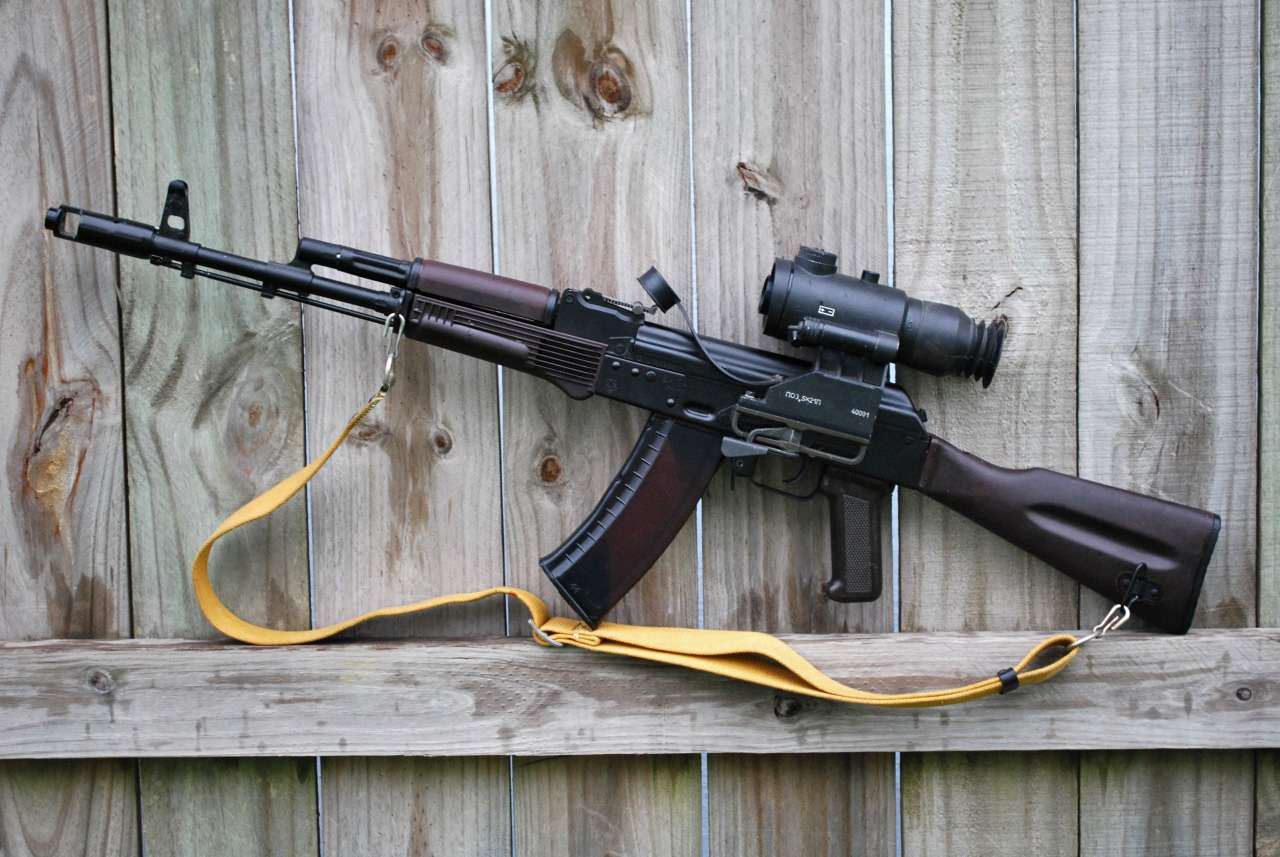
1P78 is centered over the bore and has a good height, it's about the same as an ACOG over a flat top AR or pretty darn close. Speaking of the famous 'unusually high' height of Russian optics I really don't think these optics are universally designed that way as it's usually assumed - some are and some aren't. In any case Kashtan is definitely one of the lower ones out there and is really comfortable. The 1P78 has an adjustable lense cap that rotates freely and has a semi spring loaded detent that keeps it from flopping around. Adjusting the base for a tight fit is like any AK mount optic and takes just a minute to get right. It does block the irons when mounted but not a big deal if you have your tension set properly on the clamp.
Similarities and differences with other 5.45 optics

FOV is similar to PO 3.5x21P (PO is 3.5x, Kashtan is 2.8x with the overall view at distance pretty wide for both) but Kashtan is much lighter in weight than the PO 3.5. (1.5 Lbs vs 2.25 Lbs) Tritium illumination instead of batteries on the PO...I'm really happy with this feature in particular. The Zeiss has really nice optical quality of course but for some people the reticule is a tad busy plus it's a PSO side rail design (eye relief and chin weld) which turns some people off. I love the Zeiss and can't wait to add one to the collection but they aren't for everyone in my experience.
While I love the 1P29 design, most people that have used mine to shoot have said that it isn't that much fun. The concept is pretty alien to a lot of people but it's actually ingenious if you know how it works. Basically by inverting the reticule the target does not get obscured by it during automatic fire or long range that typically requires more and more hold over. I love it, but many people don't for one reason or another. OTOH Kashtan is much more familiar for most people and so far everyone I know that has shot with it has really liked it. The reticule is clean and simple, again it's a very point and shoot optic and it works really well at longer ranges.
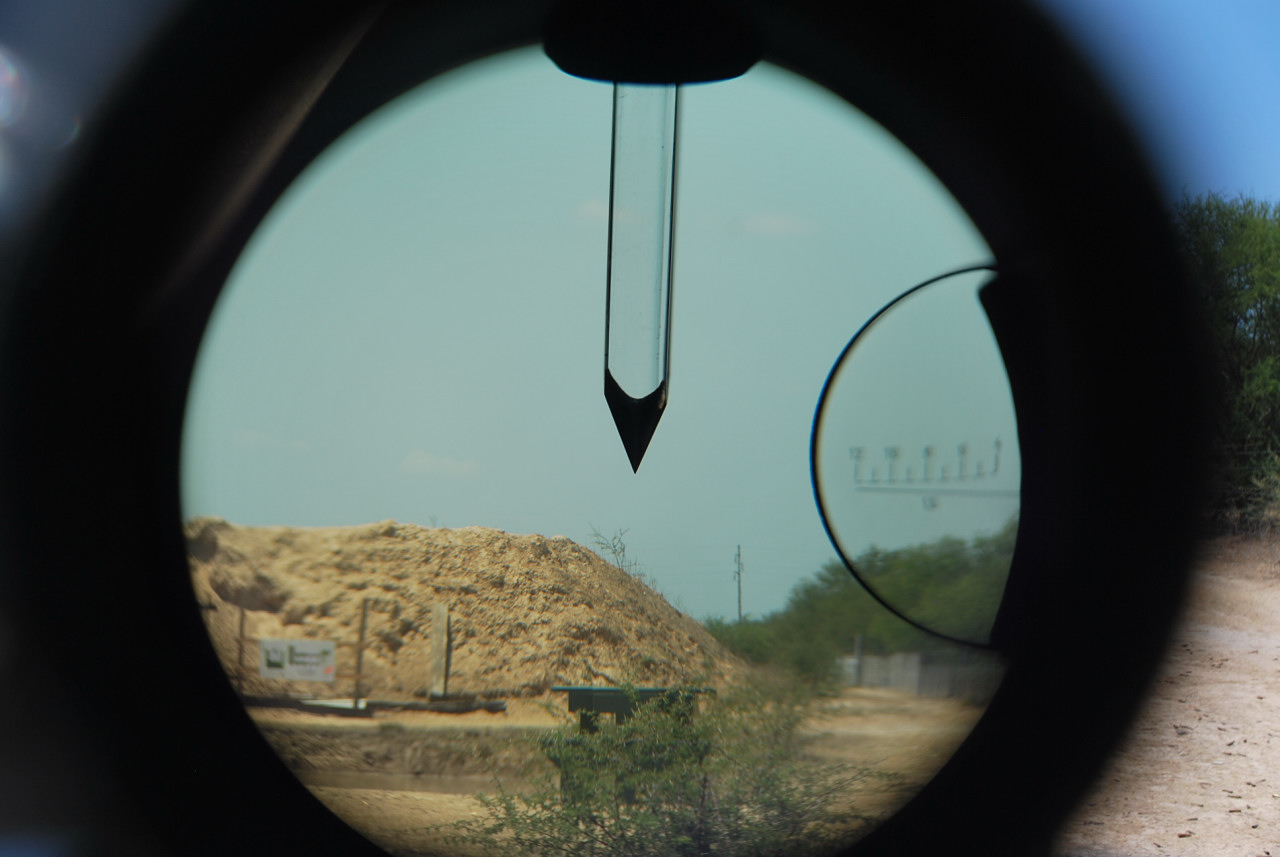
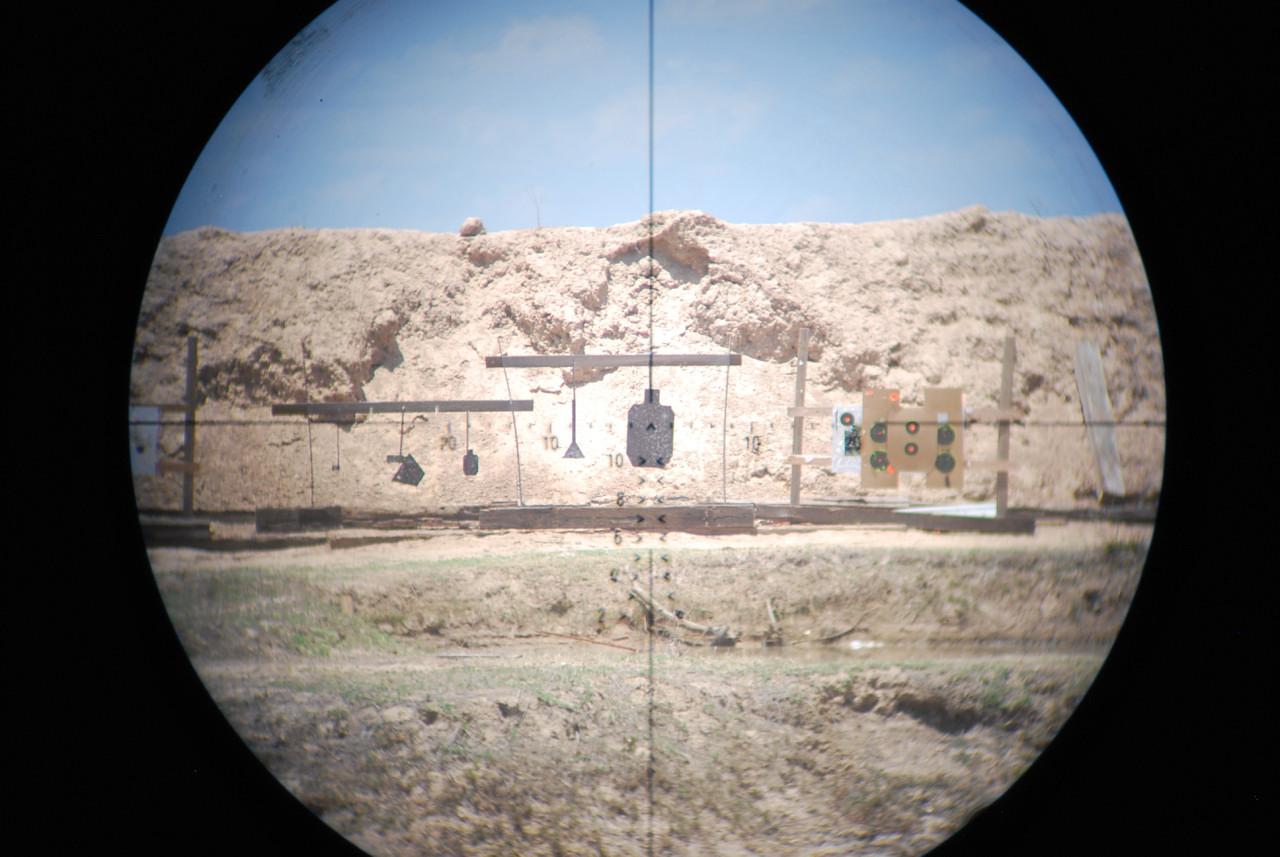
If you look at the pic of the day light reticule earlier in the thread you can see a small triangle hanging next to the large steel target. I'd say it's 6-8" on a side. Over the weekend at 300 yards I was hitting that target about 85% of the time with the Kashtan /SGL31 /7N6 combo. Not really that hard to do actually and quite a bit of fun.
1P29
4x magnification, tritium illumination. Civilian model is UPO-1
Tritium relit

PO 3.5x21P
3.5x magnification, CR123 battery illuminated
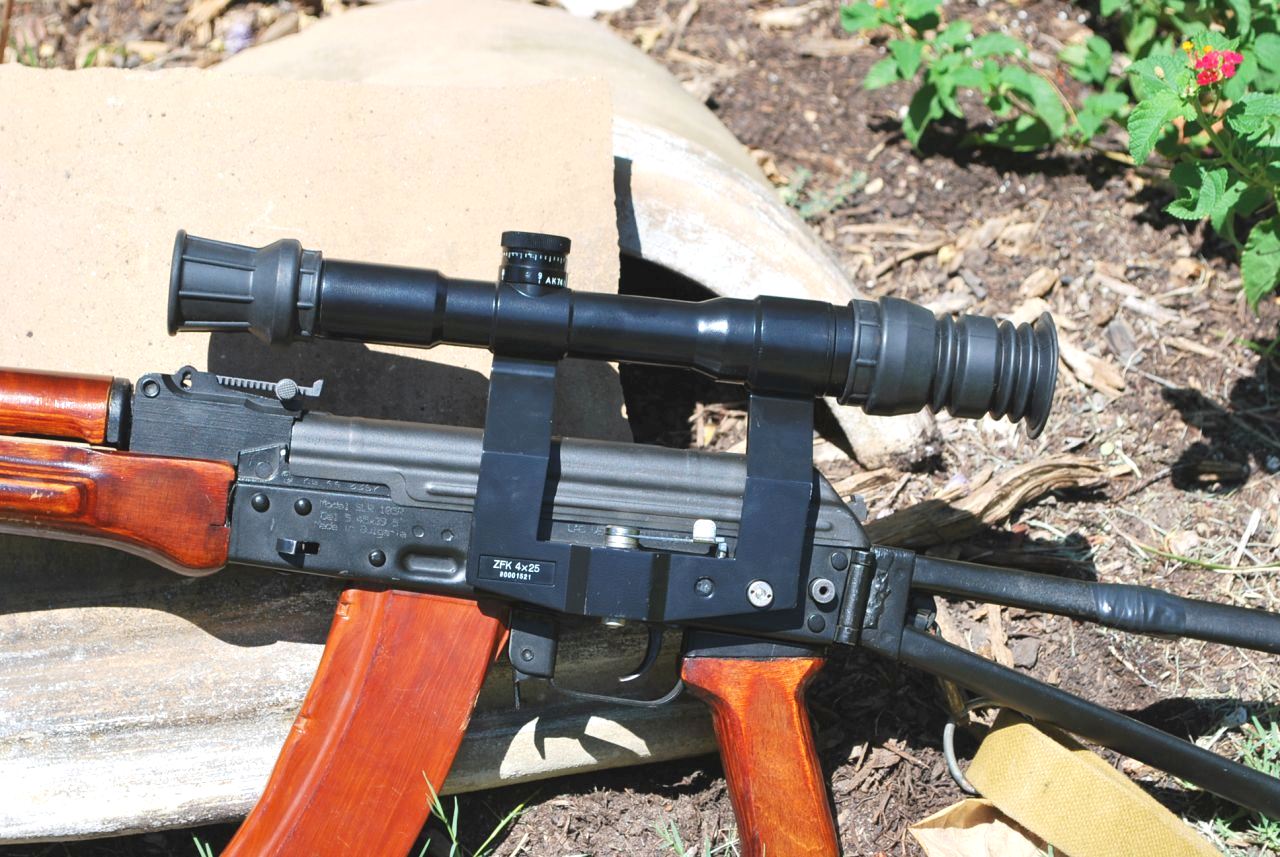
Zeiss ZFK
4x magnification, non illuminated (formerly tritium)

In conclusion I think the 1P78 is a rugged and simple optic. There's a lot of engineering in the design that has made it a pretty easy to scope and it's naturally right at home on an SGL31 type rifle, but should work fine on any 16" barrel 5.45 rifle with a side rail. Should work on the AK105 style as well but you'll probably have to learn some hold over for the second and 3rd chevron.
Also: I've worked all this out by comparing optics and reading the manuals for them but I'm not 100% on all the details just yet, I've still got some more investigation to do. My intent is to share how I think these all work rather than claiming this is written in stone, so again if anyone knows more about specifics I really welcome the education. I'm always up for learning.
Voron from theakforum.net was kind enough to translate the manual for the 1P78. I hope to have the 1P29 done by him soon as well.
In short take aim at a 44cm circle at 100m. POA is the BASE of the circle not the center. POI should be 22cm higher than POA.
Guys, this is by no means a word for word translation (that would take hours) but a quick and dirty translation of the key features that would help you understand how to properly use and maintain your 1P78.
Contents:
-Scope
-Key
-Napkin
-Cover (for storing)
-instructions
Specs:
Mag factor- 2.8x
Angled FOV-13 degrees
Diameter of exit pupil- 6mm
Range- 700 meters
mass- 0.5 kg (1.2 pounds approx)
you all probably know how to adjust your scope mount on your scope to YOUR side rail on your rifle as they are all different. the sticky on this can be found here courtesy of our good friend Doug Ford
www.tantal.kalashnikov.guns.ru/pso/clamp_adjustments.htm
Screen view
-upside down triangles (chevrons) denote distance in meters
Top is 400m, circle below it is 500, then 600 and 700 respectively.
-vertical bars are a little trickier to use.
D=your unknown distance to the target
A= angular height (height of the vertical bars corresponding to the height of your target)
B= known target size in meters, for simplicity take an average 1.7 meter man
so....... D= (B/A) x 1000
first most inner vertical bar = 2.1, second = 2.4. third=2.9 and fourth =3.6
this is how it works. The armchair commando sees a zombi in the post apocalyptic SHTF scenario...but cannot make out the distance to it, while trying to make a left eye shot...while running (of course). He unlocks his 400$ FAB defense tactical stock which was folded to the right (since we all know, side mounts are useless for AKs that have stocks that fold to the left) and tries to make out the distance.
he places the vertical bars on the KASHTAN on what appears to be a male zombie with a meat cleaver of an average height. The vertical bar that corresponds to the zombie's height happens to be the last vertical line on the left (thus 3.6)
he then takes his i-phone and quickly punches the numbers in his calculator application (from his fast finger skills, acquired from playing medal of honor in his moms basement over the years instead of getting laid)
(1.7/3.6) x 1000 ~ 472 meters.
He then puts small red dot below the first chevron (which corresponds to 500 meters) on the COM of the zombi and squeezes the trigger....only he he misses, due to failure to correct for the wind drift which put his round about 17 inches to the right of the target. The zombi got angry and hurled its cleaver (due to this being a uber strong zombi) at our hero's head, splitting it in half
but seriously, the vertical lines truly apply when your target is really far away. Within 500 meters, just use the top chevron and you will hit it somewhere. Makes sense?
––––––––––––––––––––––––––––––––––––––––––––––––––––––––––––––––––––––––––––––––
Zeroing procedure
note - this is for 53 grain 7N6 ammo, when using other commercial stuff you will be close, but keep in mind the bullet drop if using 60 or 70 grain bullets
Place a paper target @ 100 meters. In the center of a large piece of paper, place a 440 mm circle (44 cm), and from controlled environment (off sand bags) fire 4 semi-auto shots
while aiming
AT THE BOTTOM OF THE CIRCLE.
this is a critical point. Your top chevron should be at the bottom of the black circle (point of aim) and the point of impact should be IN THE CENTER of the circle, thus being 22 cm (or the radius of the circle) HIGHER then where you are aiming.
why? this is what is called 400 meter zero. From now on, if one wants to use the scope accordingly to its instructions, if you see a man and you KNOW that he/she is within 400 meters, you simply place your top chevron @ the center of mass and squeeze the trigger
just like the PO 3,5x21 if fired @ COM meters your bullets will strike
@ 100 meters - Head shots
@ 200 meters- Chin shots
@ 300 meters -Neck shots
@ 400 meter- COM shots
your groups of 4-shots while zeroing should not be greater than 5 cm (2.5 inches)
if you are not on paper, move target to 20 meters, and try to get in on paper, then repeat steps above
the elevation control is located on the top, and denoted by letter
В which is UP and
Н which is DOWN
Each click is equivalent of 3cm (~ 1 inch)
Windage controls are on the side, denoted by
л (left)
and
П (right)
You use the key (wrench) to turn the dials of the elevation/windage control
thats about it. you guys get the feel for it @ the range, place some human silhouette targets @ known distance to you @ various distances, and use the vertical lines to estimate the range. Thats how i got to understand my PO 3,5x21 scope
Thank you for purchasing the 1p78, on behalf of the Novosibirsk Optical Factory, we wish you happy zombi hunting, and remember, you have (24) months period to warranty your scope in case it breaks for whatever reason. You also must present your copy of the original receipt, or the labor will not be covered.
And good info on how to use the range finder:
im posting somewhat of a redundant post of the post Voron just wrote :beer: , but with some visual aids..
i posted these pics in another thread about the kashtan..
i checked these height and width examples with some "reduced range" targets i made and they checked out very well..
OK my explanation, in the pic, of how i used this rangefinder is not worded correctly. the "scope" does not use 1.5M for a man sized target (B in the equation). i described that wrong. the scope lets you use whatever you want to use here as long as you know the size. i chose to use 1.5 M for a man (feet to shoulders) because thats what i was used to using with my PO3.5x21.
but doing so seemed to work out very well so that each vertical line was an approx distance in 100 M increments..
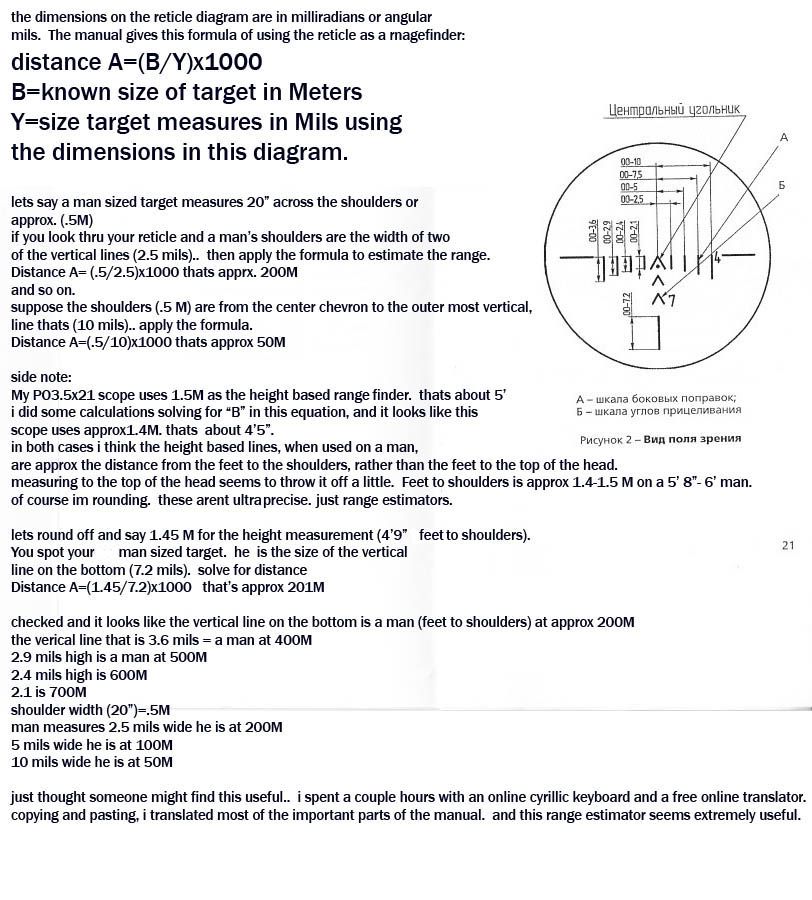
pardon the cheesy silhouette drawings.
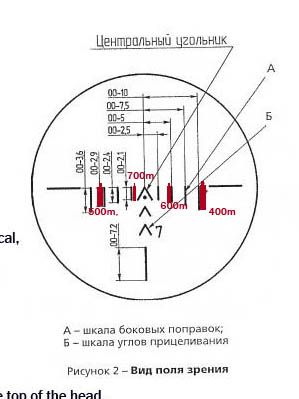
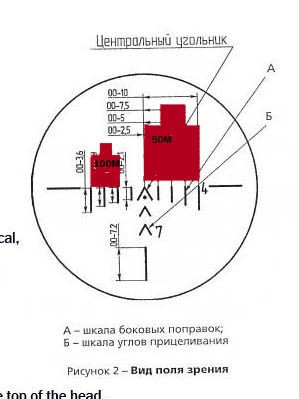
EX. for height and width at 200M

examples for 400-700M height based
EX. for width.. image represents width of head and shoulders
the B in the equation = known target size in meters..
this can be anything you decide really...
Voron for example used average 1.7 Meter man to top of head
i used feet to shoulders approx 1.5 Meter..
either way gets the same results i believe..
the 3.6 Mil line if used to the top of the head of your man will be closer to 500 as voron calculated, or will be closer to 400 when used to the shoulder..
i figured it would be a good idea to calculate some of these and memorize them ahead of time.. my iphone calculator ninja skills are pretty sketchy to say the least.. :grin:
1P29 translation, thanks Voron!
Basically set the rear sight leaf on 4, fire a group and then move the 1P29 reticule to point of impact
ZEROING
––––––––––––––––––
1)slide on the correct axis cam (of your rifle type)
2)put the scope on the rifle via clamping rail
3)PUT your rear leaf blade to position "4" or 400 meters
4)fire 5 shots on semi-auto using open sights with rear leaf set on "4"
5)fire 5 shots with scope
6)check the deviation from both strings of fire
7)If your POI differentiates,turn 1-2 turns screw (9), (to loosen it)
8)and using provided key-screwdriver bring the POIs together by turning screw-axis (8) AND (13)
8)tighten (9)
check now and see where you are.
PO 3.5x21P
Zero at 100m using the small boresight cross at the top and moving the cross to POI. After zeroing use the large chevron for center mass shots out to 400m and the corresponding range mark for further distances.


You can see here on the PK01VS data card that you can also do a 300m zero, just shoot 13cm high at 100m instead of 24cm
Z
Thought you might be interested in a little more detailed info on the 5.45 optics and the Russian 400m zero for the AK74
I've posted all these pics in the pic thread already but I wanted to add the specific information about each optic and some clarification on the 400m zero principle. I hope the wording makes sense, it's easy enough to do in real life actually and sounds more complicated than it really is.
I recently acquired the very modern 1P78 Kashtan optic calibrated for 5.45x39. Miglan did a really sweet review also, I thought I'd put my thoughts down and at the same time add a little about the different 5.45 optic's on the market. It shouldn't really be a surprise if you're into AK's but the Russians have made newer designs than the older PSO/POSP series optics that we are familiar with. They have built a few dedicated 5.45 designs which have modern features and interesting concepts. Being a 5.45 buff I've picked up a few of these optics and figured I'd put out some observations and theories along with some hands on experiences.
First off a little background on what is available in 5.45 calibration and a little about what they are designed for, at least as I understand it. There are 4 5.45x39 optics that I know of: PO 3.5x21P, Zeiss ZFK 4x25, 1P29 and now the 1P78 Kashtan. The Zeiss is the oldest of them being a cold war optic with a PSO body style and chin weld. Don't let the age and appearance fool you though, it's a tight little optic with amazing glass quality. The 1P29 is a Soviet copy of the British Trilux/SUIT optic with the inverted reticule and all, also relatively older but with some modern design built in. PO 3.5x21P is a wide angle, huge FOV optic that I believe was intended to try and capture military sales but so far hasn't in Russia (UPDATE: Venezuela has purchased PO 3.5x21P for the Army and it is in service on the AK103 with 7.62x39 calibration). Lastly the new 1P78 Kashtan has arrived, it is current military issue and has been accepted for service from what I know.
According to the documentation I've seen for the modern 5.45 optics they are designed for rapid target acquisition and first round hits out to 400m, which seems to be the distance the Russians are optimizing these scopes for and employment of the AK74M too. I first heard of this number with the PK-AS red dot and it has come up a few times with optics like 1P29 and 1P78 also, as far as I can see the Russians feel this is a practical engagement distance for the AK74M, and my own experience lines up with this too.
From my understanding the basic concept is to zero the optic at 100m but have point of impact higher than point of aim, this creates a 400m zero (or a 300m zero) based how much higher POI is than POA at 100m.
As you can see from the data cards if you want a 400m zero all you have to do is make your rounds land 24cm higher than your point of aim when zeroing (from 100m).
If you want a 300m zero make your rounds land 13cm higher than point of aim (also at 100m)
300m zero
So basically instead of having your point of impact match your point of aim at 100m and then knowing hold overs, the Russians have simplified the concept by making point of impact higher than point of aim.
At closer ranges the round will hit in the head/upper torso region while at longer ranges the same center mass point of aim will get hits at the expected point of aim. What this means in the field is a simple point and shoot always COM point of aim that's good from close to long range. All the 74M rifleman needs to do is line up and shoot without having to get into detail on range finding etc. Seems like this is the same concept as using a red dot vs irons, or why ACOG's are so popular on AR's. Generally speaking t it looks like the magic difference in POI vs POA at 100m is about 22-25cm.
After experimenting with this type of zero out to 300 yards on a few 5.45 optics I have to say for field conditions it works really well, just as intended. It's not so hot when you're trying to impress your friends shooting clays off the backstop at 100 yards due to the difference in POI vs POA, but for snap shooting on larger targets it's been working great. Basically it's the same concept as zeroing at 100m with irons and then switching to battlesight and leaving it alone. With both irons and these scopes effectively you point and shoot for most ranges and can reasonably expect hits somewhere on the target. Pretty much the same as I was trained in the Army back in the day, use a little hold over or under but don't change anything mechanical, just shoot when you see the target.
Another difference between modern optics like 1P29, PO 3.5 and Kashtan vs the older PSO series is that part of the fast acquisition concept is based on the reticule itself and the fact that you don't fool with the turrets for long range shooting. If zeroed properly you use the same chevron all the way out to 400m, then depending on the optic you may have additional chevrons for 500-700m for example, or in the case of the 1P29 a simple cam for the longer shots. For these modern scopes it's the reticule that does the work which lends itself to quicker shooting. While PSO's have additional chevrons for quick long range shooting, the Kashtan and PO3.5 have dispensed with the turret being used for the BDC correction. Again that means nothing to fiddle with in the field, just aim and shoot.
Impressions of the Kashtan itself
FOV is really nice, pretty similar to the PO 3.5x21P and much better than 1P29 or the ZFK. At 2.8x it ends up being a really usable magnification that in some ways does seem more like a red dot than a magnified scope. Both eyes open shooting is possible but not quite as easy as PK-AS or Rakurz because of the eye cup and while it does have eye relief it's easily taken care of with the rubber eyepiece (a common feature on Soviet/Russian scopes and works really well). The optic has an orange/yellow coating designed to reduce eye strain and enhance clarity (thanks to Doug Ford/Tantal for the clarification on that).
The Kashtan is tritium illuminated meaning no batteries and no circuitry to break, it's always on and the operator has to do nothing to get the illumination to work. The reticule is black during the day but When light levels drop low enough you can immediately see the illumination. This is a feature I am really enjoying on modern Russian optics like Kashtan, 1P76 Rakurz and the 1P29/UPO-1, it's smart and very simple. No more complaints about battery life on combloc optics

1P78 is centered over the bore and has a good height, it's about the same as an ACOG over a flat top AR or pretty darn close. Speaking of the famous 'unusually high' height of Russian optics I really don't think these optics are universally designed that way as it's usually assumed - some are and some aren't. In any case Kashtan is definitely one of the lower ones out there and is really comfortable. The 1P78 has an adjustable lense cap that rotates freely and has a semi spring loaded detent that keeps it from flopping around. Adjusting the base for a tight fit is like any AK mount optic and takes just a minute to get right. It does block the irons when mounted but not a big deal if you have your tension set properly on the clamp.
Similarities and differences with other 5.45 optics
FOV is similar to PO 3.5x21P (PO is 3.5x, Kashtan is 2.8x with the overall view at distance pretty wide for both) but Kashtan is much lighter in weight than the PO 3.5. (1.5 Lbs vs 2.25 Lbs) Tritium illumination instead of batteries on the PO...I'm really happy with this feature in particular. The Zeiss has really nice optical quality of course but for some people the reticule is a tad busy plus it's a PSO side rail design (eye relief and chin weld) which turns some people off. I love the Zeiss and can't wait to add one to the collection but they aren't for everyone in my experience.
While I love the 1P29 design, most people that have used mine to shoot have said that it isn't that much fun. The concept is pretty alien to a lot of people but it's actually ingenious if you know how it works. Basically by inverting the reticule the target does not get obscured by it during automatic fire or long range that typically requires more and more hold over. I love it, but many people don't for one reason or another. OTOH Kashtan is much more familiar for most people and so far everyone I know that has shot with it has really liked it. The reticule is clean and simple, again it's a very point and shoot optic and it works really well at longer ranges.
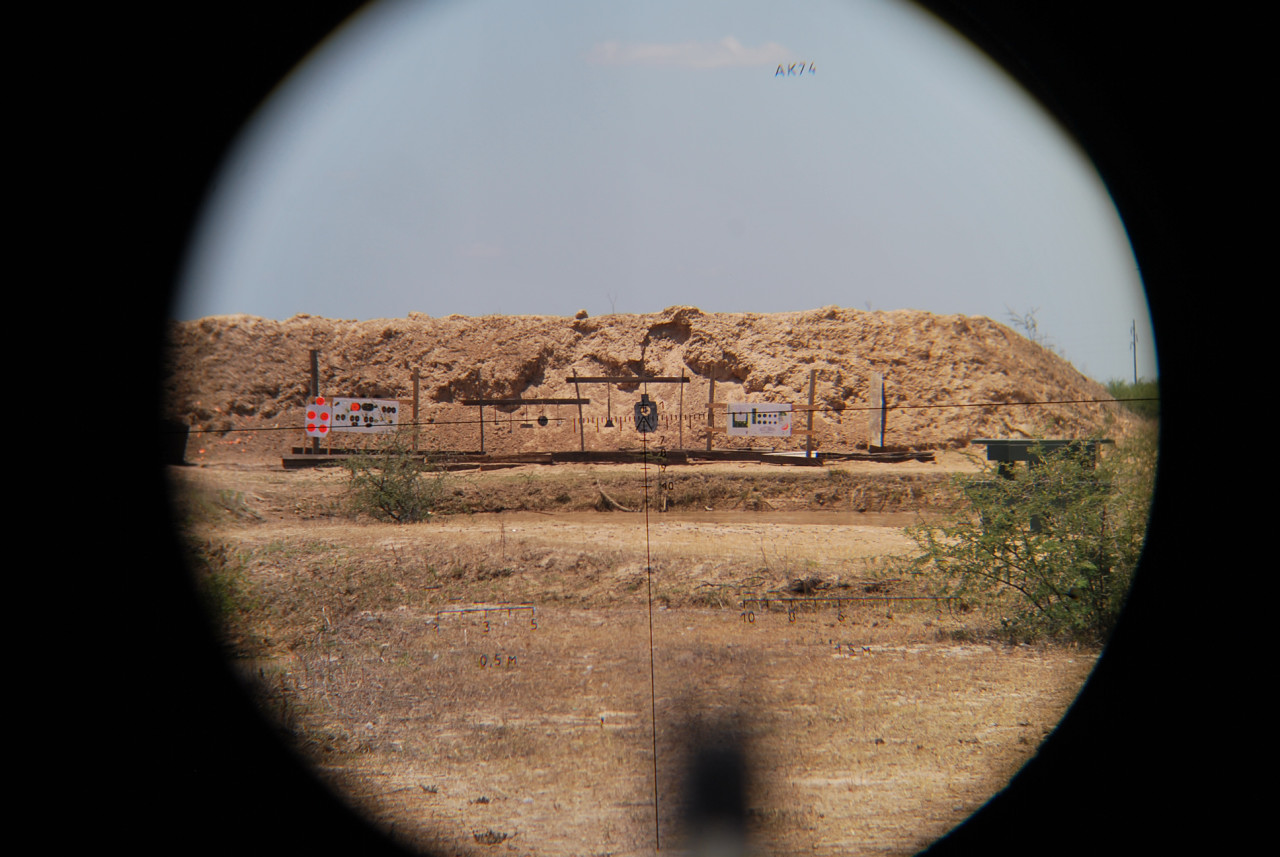
If you look at the pic of the day light reticule earlier in the thread you can see a small triangle hanging next to the large steel target. I'd say it's 6-8" on a side. Over the weekend at 300 yards I was hitting that target about 85% of the time with the Kashtan /SGL31 /7N6 combo. Not really that hard to do actually and quite a bit of fun.
1P29
4x magnification, tritium illumination. Civilian model is UPO-1
Tritium relit
PO 3.5x21P
3.5x magnification, CR123 battery illuminated
Zeiss ZFK
4x magnification, non illuminated (formerly tritium)
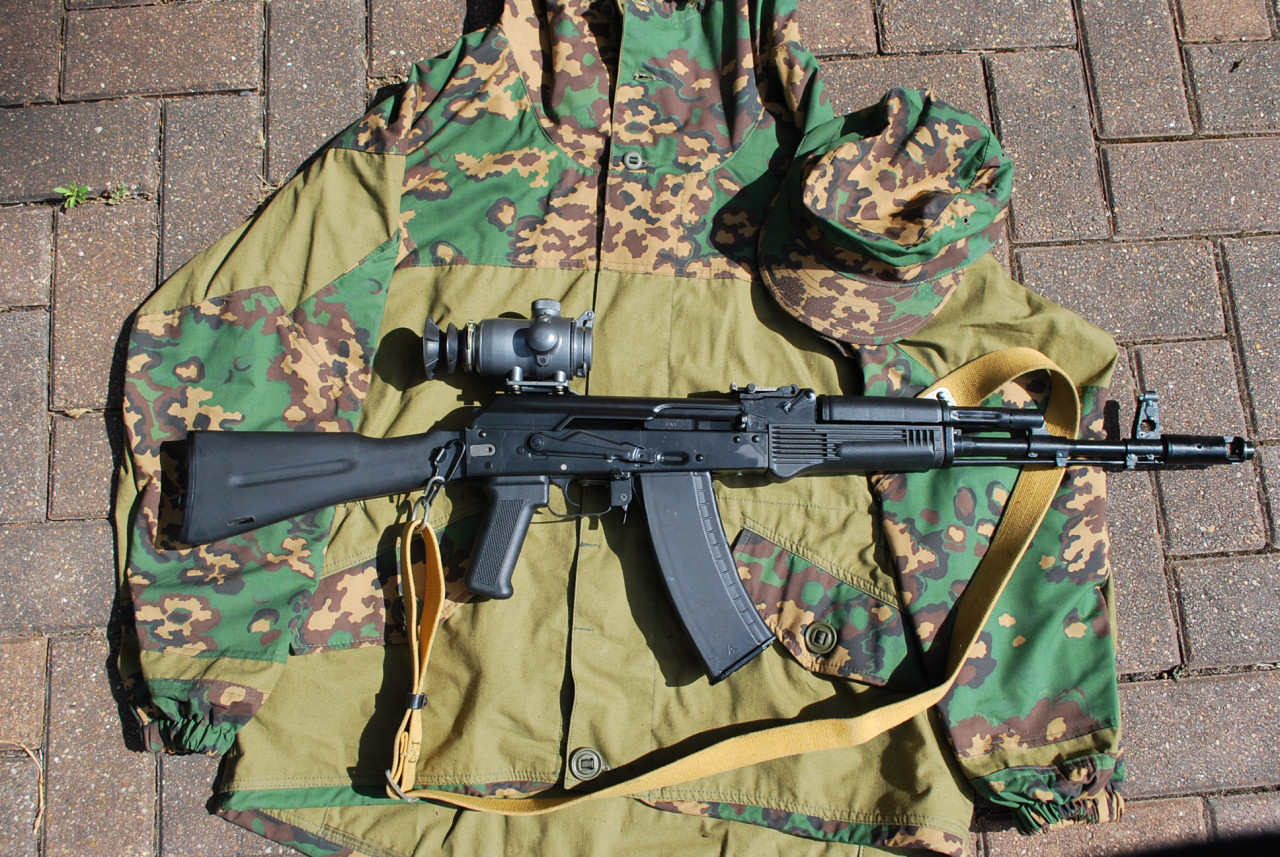
In conclusion I think the 1P78 is a rugged and simple optic. There's a lot of engineering in the design that has made it a pretty easy to scope and it's naturally right at home on an SGL31 type rifle, but should work fine on any 16" barrel 5.45 rifle with a side rail. Should work on the AK105 style as well but you'll probably have to learn some hold over for the second and 3rd chevron.
Also: I've worked all this out by comparing optics and reading the manuals for them but I'm not 100% on all the details just yet, I've still got some more investigation to do. My intent is to share how I think these all work rather than claiming this is written in stone, so again if anyone knows more about specifics I really welcome the education. I'm always up for learning.
Voron from theakforum.net was kind enough to translate the manual for the 1P78. I hope to have the 1P29 done by him soon as well.
In short take aim at a 44cm circle at 100m. POA is the BASE of the circle not the center. POI should be 22cm higher than POA.
Voron said:
Guys, this is by no means a word for word translation (that would take hours) but a quick and dirty translation of the key features that would help you understand how to properly use and maintain your 1P78.
Contents:
-Scope
-Key
-Napkin
-Cover (for storing)
-instructions
Specs:
Mag factor- 2.8x
Angled FOV-13 degrees
Diameter of exit pupil- 6mm
Range- 700 meters
mass- 0.5 kg (1.2 pounds approx)
you all probably know how to adjust your scope mount on your scope to YOUR side rail on your rifle as they are all different. the sticky on this can be found here courtesy of our good friend Doug Ford
www.tantal.kalashnikov.guns.ru/pso/clamp_adjustments.htm
Screen view
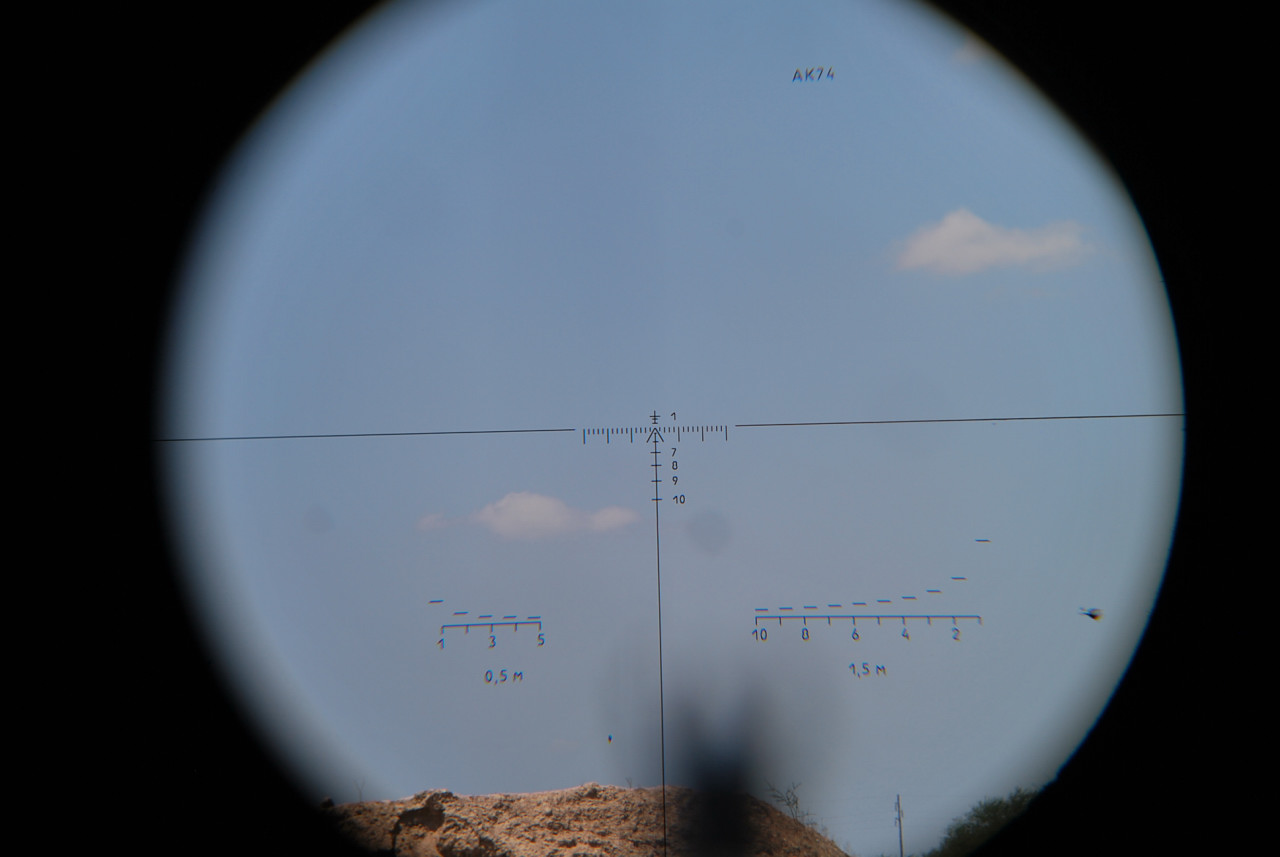
-upside down triangles (chevrons) denote distance in meters
Top is 400m, circle below it is 500, then 600 and 700 respectively.
-vertical bars are a little trickier to use.
D=your unknown distance to the target
A= angular height (height of the vertical bars corresponding to the height of your target)
B= known target size in meters, for simplicity take an average 1.7 meter man
so....... D= (B/A) x 1000
first most inner vertical bar = 2.1, second = 2.4. third=2.9 and fourth =3.6
this is how it works. The armchair commando sees a zombi in the post apocalyptic SHTF scenario...but cannot make out the distance to it, while trying to make a left eye shot...while running (of course). He unlocks his 400$ FAB defense tactical stock which was folded to the right (since we all know, side mounts are useless for AKs that have stocks that fold to the left) and tries to make out the distance.
he places the vertical bars on the KASHTAN on what appears to be a male zombie with a meat cleaver of an average height. The vertical bar that corresponds to the zombie's height happens to be the last vertical line on the left (thus 3.6)
he then takes his i-phone and quickly punches the numbers in his calculator application (from his fast finger skills, acquired from playing medal of honor in his moms basement over the years instead of getting laid)
(1.7/3.6) x 1000 ~ 472 meters.
He then puts small red dot below the first chevron (which corresponds to 500 meters) on the COM of the zombi and squeezes the trigger....only he he misses, due to failure to correct for the wind drift which put his round about 17 inches to the right of the target. The zombi got angry and hurled its cleaver (due to this being a uber strong zombi) at our hero's head, splitting it in half
but seriously, the vertical lines truly apply when your target is really far away. Within 500 meters, just use the top chevron and you will hit it somewhere. Makes sense?
––––––––––––––––––––––––––––––––––––––––––––––––––––––––––––––––––––––––––––––––
Zeroing procedure
note - this is for 53 grain 7N6 ammo, when using other commercial stuff you will be close, but keep in mind the bullet drop if using 60 or 70 grain bullets
Place a paper target @ 100 meters. In the center of a large piece of paper, place a 440 mm circle (44 cm), and from controlled environment (off sand bags) fire 4 semi-auto shots
while aiming
AT THE BOTTOM OF THE CIRCLE.
this is a critical point. Your top chevron should be at the bottom of the black circle (point of aim) and the point of impact should be IN THE CENTER of the circle, thus being 22 cm (or the radius of the circle) HIGHER then where you are aiming.
why? this is what is called 400 meter zero. From now on, if one wants to use the scope accordingly to its instructions, if you see a man and you KNOW that he/she is within 400 meters, you simply place your top chevron @ the center of mass and squeeze the trigger
just like the PO 3,5x21 if fired @ COM meters your bullets will strike
@ 100 meters - Head shots
@ 200 meters- Chin shots
@ 300 meters -Neck shots
@ 400 meter- COM shots
your groups of 4-shots while zeroing should not be greater than 5 cm (2.5 inches)
if you are not on paper, move target to 20 meters, and try to get in on paper, then repeat steps above
the elevation control is located on the top, and denoted by letter
В which is UP and
Н which is DOWN
Each click is equivalent of 3cm (~ 1 inch)
Windage controls are on the side, denoted by
л (left)
and
П (right)
You use the key (wrench) to turn the dials of the elevation/windage control
thats about it. you guys get the feel for it @ the range, place some human silhouette targets @ known distance to you @ various distances, and use the vertical lines to estimate the range. Thats how i got to understand my PO 3,5x21 scope
Thank you for purchasing the 1p78, on behalf of the Novosibirsk Optical Factory, we wish you happy zombi hunting, and remember, you have (24) months period to warranty your scope in case it breaks for whatever reason. You also must present your copy of the original receipt, or the labor will not be covered.
And good info on how to use the range finder:
fearrainsdown said:
im posting somewhat of a redundant post of the post Voron just wrote :beer: , but with some visual aids..
i posted these pics in another thread about the kashtan..
i checked these height and width examples with some "reduced range" targets i made and they checked out very well..
OK my explanation, in the pic, of how i used this rangefinder is not worded correctly. the "scope" does not use 1.5M for a man sized target (B in the equation). i described that wrong. the scope lets you use whatever you want to use here as long as you know the size. i chose to use 1.5 M for a man (feet to shoulders) because thats what i was used to using with my PO3.5x21.
but doing so seemed to work out very well so that each vertical line was an approx distance in 100 M increments..
pardon the cheesy silhouette drawings.
EX. for height and width at 200M
examples for 400-700M height based
EX. for width.. image represents width of head and shoulders
the B in the equation = known target size in meters..
this can be anything you decide really...
Voron for example used average 1.7 Meter man to top of head
i used feet to shoulders approx 1.5 Meter..
either way gets the same results i believe..
the 3.6 Mil line if used to the top of the head of your man will be closer to 500 as voron calculated, or will be closer to 400 when used to the shoulder..
i figured it would be a good idea to calculate some of these and memorize them ahead of time.. my iphone calculator ninja skills are pretty sketchy to say the least.. :grin:
1P29 translation, thanks Voron!
Originally Posted By Voron from theakforum.net:
ok, had some time
-General Instructions/Safety precautions.
this device processes a radioactive element that falls into category of Group 1. The glass of the vile is strong enough to protect the user for the radioactive decay. (Tritium is basically H3, hydrogen isotope, same number of protons, but diff neutrons. This isotope decays via beta decay, releasing ~ 6 Kev electrons that are responsible for the illumination...these are very weak energy electrons that dont even have enough umph to go past your skin. pretty mild stuff)
In case of breakage of the vile, it doesnt present as any eminent danger to the user, or those surrounding. It doesnt matter if this occurs inside or out on the fresh air. As long as the vile didnt break and got inside a open sore/cut. If the last one did take place, wash out with water carefully and then seek medical help, and advise those helping you of your contact with tritium
Leave the area and air it out for 0.5 hours, then check the air level. Wipe down with water (the area). take the broken parts to controlled radiative service center
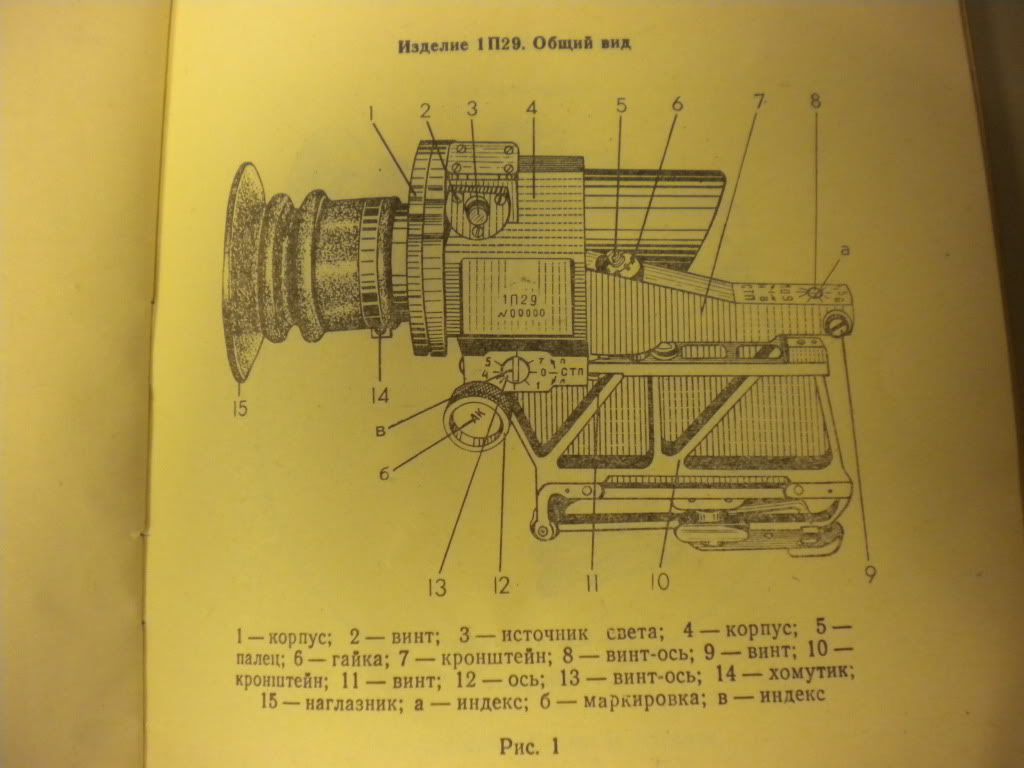
1) body
2)screw
3)illuminator
4)body
5)finger-type screw
6)nut
7)Mount
8)axis-screw
9)screw
10)mount
11)screw
12)Axis cams
13)axis-screw
14)....not sure
15)eye piece
16)a-index, b-markings(for which weapon, hence this one is fro AK), little b index
CAMS/adjustments.
-To install the proper cam (12), is dependent on the type of firearm that will be selected by the user
1)unscrew the screw with spring washer (11)
2)unscrew about 1-2 revolutions screw (9)
3)unscrew screw (8) about 5-7mm
4)unscrew nut (6) until endpiece of inner screw (5), while noting and remembering its original position
5)Lift the mount (7) above mount (10)
6)get the axis #12 (cam)
7)install the correct one (basically make sure you are putting the right cam on the right caliber weapon)
8)tighten spring , when tightening nut (6) to its original position
9)tighten screw (8) about 5-7mm
10)secure screw (8), while tightening screw (9) until the end
11)tighten screw with springlike-washer (11) until the end
––––––––––––––––––––––––––––––––––––––––––––––––––––––––––––––––––––––––––––––––––––––––––––––––––-
done
ok, had some time
-General Instructions/Safety precautions.
this device processes a radioactive element that falls into category of Group 1. The glass of the vile is strong enough to protect the user for the radioactive decay. (Tritium is basically H3, hydrogen isotope, same number of protons, but diff neutrons. This isotope decays via beta decay, releasing ~ 6 Kev electrons that are responsible for the illumination...these are very weak energy electrons that dont even have enough umph to go past your skin. pretty mild stuff)
In case of breakage of the vile, it doesnt present as any eminent danger to the user, or those surrounding. It doesnt matter if this occurs inside or out on the fresh air. As long as the vile didnt break and got inside a open sore/cut. If the last one did take place, wash out with water carefully and then seek medical help, and advise those helping you of your contact with tritium
Leave the area and air it out for 0.5 hours, then check the air level. Wipe down with water (the area). take the broken parts to controlled radiative service center
1) body
2)screw
3)illuminator
4)body
5)finger-type screw
6)nut
7)Mount
8)axis-screw
9)screw
10)mount
11)screw
12)Axis cams
13)axis-screw
14)....not sure
15)eye piece
16)a-index, b-markings(for which weapon, hence this one is fro AK), little b index
CAMS/adjustments.
-To install the proper cam (12), is dependent on the type of firearm that will be selected by the user
1)unscrew the screw with spring washer (11)
2)unscrew about 1-2 revolutions screw (9)
3)unscrew screw (8) about 5-7mm
4)unscrew nut (6) until endpiece of inner screw (5), while noting and remembering its original position
5)Lift the mount (7) above mount (10)
6)get the axis #12 (cam)
7)install the correct one (basically make sure you are putting the right cam on the right caliber weapon)
8)tighten spring , when tightening nut (6) to its original position
9)tighten screw (8) about 5-7mm
10)secure screw (8), while tightening screw (9) until the end
11)tighten screw with springlike-washer (11) until the end
––––––––––––––––––––––––––––––––––––––––––––––––––––––––––––––––––––––––––––––––––––––––––––––––––-
done
Basically set the rear sight leaf on 4, fire a group and then move the 1P29 reticule to point of impact
Voron said:
ZEROING
––––––––––––––––––
1)slide on the correct axis cam (of your rifle type)
2)put the scope on the rifle via clamping rail
3)PUT your rear leaf blade to position "4" or 400 meters
4)fire 5 shots on semi-auto using open sights with rear leaf set on "4"
5)fire 5 shots with scope
6)check the deviation from both strings of fire
7)If your POI differentiates,turn 1-2 turns screw (9), (to loosen it)
8)and using provided key-screwdriver bring the POIs together by turning screw-axis (8) AND (13)
8)tighten (9)
check now and see where you are.
PO 3.5x21P
Zero at 100m using the small boresight cross at the top and moving the cross to POI. After zeroing use the large chevron for center mass shots out to 400m and the corresponding range mark for further distances.
You can see here on the PK01VS data card that you can also do a 300m zero, just shoot 13cm high at 100m instead of 24cm
Z

