Post by 4track on Mar 10, 2013 15:46:10 GMT -5
The weather outside was delightful today, so I decided to repaint my bolt gun. Since others have asked, I thought I would share how I like to rattle can some Multicam!
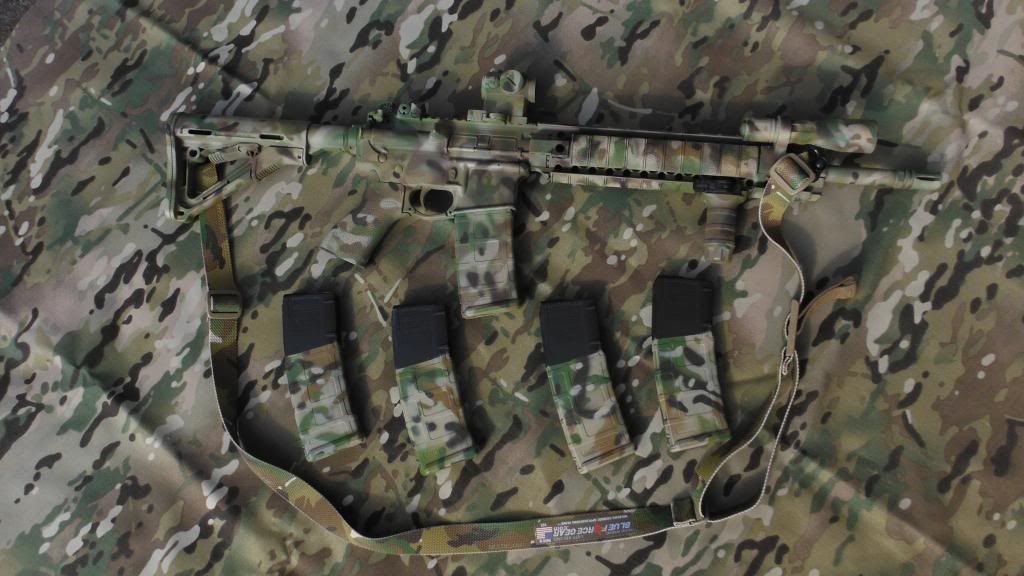
Here is the rifle, in all of its Black and Tan awesomenes

The first thing that I did was degrease all of the surfaces that I wanted to paint, using some rubbing alcohol. Then I dissasembled and/or masked any areas that I did not want to paint.
s99.beta.photobucket.com/user/baziuk/media/Remington%20700%20AAC%20SD%20MANNERS%20T4/MULTICAM70001_zpsf5b75dd9.jpg.html
For the first layer of the pattern, I used some Krylon Khaki (I was short on Aervoe). Using a light colored base coat helps the other colors to show better, and if this if the first time painting a black rifle, I will often apply two light coats of this color, to get all of the factory black covered. I let the Khaki layer dry in the sun for about twenty minutes, by hanging the rifle from a tree limb with a coat hanger through the flash hider.
s99.beta.photobucket.com/user/baziuk/media/Remington%20700%20AAC%20SD%20MANNERS%20T4/MULTICAM70002_zpse24d4489.jpg.html
Next, I used some of my home-cut plastic stencils and some Aervoe Field Drab (ignore the can's greyish cap, it tastes just like Coyote Brown). I blended the Field Drab into the Khaki, with a hard edge on the curvy stencil side, and gradually faded into the Khaki.
s99.beta.photobucket.com/user/baziuk/media/Remington%20700%20AAC%20SD%20MANNERS%20T4/MULTICAM70003_zps3ea61f41.jpg.html
I like to get about a 50/50 surface area coverage of the Field Drab and Khaki, and it ends up looking alot like Brittish Desert DPM pattern.
s99.beta.photobucket.com/user/baziuk/media/Remington%20700%20AAC%20SD%20MANNERS%20T4/MULTICAM70004_zpsa569dcfa.jpg.html
After that dried in the sun for about twenty minutes, I used a second Multicam shaped stencil, and applied Aervoe Dark Green. I faded this green into a lighter green from Krylon (Short on Aervoe, again), which, in turn, faded into the brown/tan background.
s99.beta.photobucket.com/user/baziuk/media/Remington%20700%20AAC%20SD%20MANNERS%20T4/MULTICAM70005_zps115471d6.jpg.html
Now the pattern started to take shape, but it was not quite complete, yet.
s99.beta.photobucket.com/user/baziuk/media/Remington%20700%20AAC%20SD%20MANNERS%20T4/MULTICAM70006_zps64b97b1b.jpg.html
After that layer dried for about twenty minutes, I took a third stencil, with smaller Multicam shapes, and hit that with a layer for Aervoe Sand.
s99.beta.photobucket.com/user/baziuk/media/Remington%20700%20AAC%20SD%20MANNERS%20T4/MULTICAM70007_zpsceca8e6d.jpg.html
Twenty minutes later, I used the same stencil, and hit it again using Earth Brown.
s99.beta.photobucket.com/user/baziuk/media/Remington%20700%20AAC%20SD%20MANNERS%20T4/MULTICAM70008_zps6667b24b.jpg.html
I let that dry to the touch, and then I removed all of the masking tape, and reassembled the weapon.
s99.beta.photobucket.com/user/baziuk/media/Remington%20700%20AAC%20SD%20MANNERS%20T4/MULTICAM70009_zps517be972.jpg.html
I then let the compelted piece dry in the sun for the remaineder of the day, flipping sides every few hours, to get dirtect sun on all surfaces.
s99.beta.photobucket.com/user/baziuk/media/Remington%20700%20AAC%20SD%20MANNERS%20T4/MULTICAM70011_zps16cd81b4.jpg.html
s99.beta.photobucket.com/user/baziuk/media/Remington%20700%20AAC%20SD%20MANNERS%20T4/MULTICAM70012_zps16b08ca9.jpg.html
I will wait another day or two for it to fully cure indoors, and then it should be ready to shoot.


Here is the rifle, in all of its Black and Tan awesomenes
The first thing that I did was degrease all of the surfaces that I wanted to paint, using some rubbing alcohol. Then I dissasembled and/or masked any areas that I did not want to paint.
s99.beta.photobucket.com/user/baziuk/media/Remington%20700%20AAC%20SD%20MANNERS%20T4/MULTICAM70001_zpsf5b75dd9.jpg.html
For the first layer of the pattern, I used some Krylon Khaki (I was short on Aervoe). Using a light colored base coat helps the other colors to show better, and if this if the first time painting a black rifle, I will often apply two light coats of this color, to get all of the factory black covered. I let the Khaki layer dry in the sun for about twenty minutes, by hanging the rifle from a tree limb with a coat hanger through the flash hider.
s99.beta.photobucket.com/user/baziuk/media/Remington%20700%20AAC%20SD%20MANNERS%20T4/MULTICAM70002_zpse24d4489.jpg.html
Next, I used some of my home-cut plastic stencils and some Aervoe Field Drab (ignore the can's greyish cap, it tastes just like Coyote Brown). I blended the Field Drab into the Khaki, with a hard edge on the curvy stencil side, and gradually faded into the Khaki.
s99.beta.photobucket.com/user/baziuk/media/Remington%20700%20AAC%20SD%20MANNERS%20T4/MULTICAM70003_zps3ea61f41.jpg.html
I like to get about a 50/50 surface area coverage of the Field Drab and Khaki, and it ends up looking alot like Brittish Desert DPM pattern.
s99.beta.photobucket.com/user/baziuk/media/Remington%20700%20AAC%20SD%20MANNERS%20T4/MULTICAM70004_zpsa569dcfa.jpg.html
After that dried in the sun for about twenty minutes, I used a second Multicam shaped stencil, and applied Aervoe Dark Green. I faded this green into a lighter green from Krylon (Short on Aervoe, again), which, in turn, faded into the brown/tan background.
s99.beta.photobucket.com/user/baziuk/media/Remington%20700%20AAC%20SD%20MANNERS%20T4/MULTICAM70005_zps115471d6.jpg.html
Now the pattern started to take shape, but it was not quite complete, yet.
s99.beta.photobucket.com/user/baziuk/media/Remington%20700%20AAC%20SD%20MANNERS%20T4/MULTICAM70006_zps64b97b1b.jpg.html
After that layer dried for about twenty minutes, I took a third stencil, with smaller Multicam shapes, and hit that with a layer for Aervoe Sand.
s99.beta.photobucket.com/user/baziuk/media/Remington%20700%20AAC%20SD%20MANNERS%20T4/MULTICAM70007_zpsceca8e6d.jpg.html
Twenty minutes later, I used the same stencil, and hit it again using Earth Brown.
s99.beta.photobucket.com/user/baziuk/media/Remington%20700%20AAC%20SD%20MANNERS%20T4/MULTICAM70008_zps6667b24b.jpg.html
I let that dry to the touch, and then I removed all of the masking tape, and reassembled the weapon.
s99.beta.photobucket.com/user/baziuk/media/Remington%20700%20AAC%20SD%20MANNERS%20T4/MULTICAM70009_zps517be972.jpg.html
I then let the compelted piece dry in the sun for the remaineder of the day, flipping sides every few hours, to get dirtect sun on all surfaces.
s99.beta.photobucket.com/user/baziuk/media/Remington%20700%20AAC%20SD%20MANNERS%20T4/MULTICAM70011_zps16cd81b4.jpg.html
s99.beta.photobucket.com/user/baziuk/media/Remington%20700%20AAC%20SD%20MANNERS%20T4/MULTICAM70012_zps16b08ca9.jpg.html
I will wait another day or two for it to fully cure indoors, and then it should be ready to shoot.